
Oracle Database 19c(19.3)をLinuxにインストールする手順を紹介します。
今回はOracle Databaseのソフトウェアインストールとサンプルデータベースを作成してみます。
使用するOSバージョンとOracle Databaseバージョン
OS: Oracle Linux Server release 7.7
Oracle Database: Oracle Database 19c (19.3) for Linux x86

インストールメディアのダウンロード
まずは以下のOracleダウンロードサイトにアクセスします。

「Oracle Database 19c (19.3)」 → 「Linux x86-64」 → 「See All」クリック
「LINUX.X64_193000_db_home.zip」をクリックしてダウンロード
※ダウンロードにはオラクルへのログインが必要になります。
Oracle Databaseインストール前の準備
GUI画面表示を自分のPCに転送するためパッケージをインストール
今回はGUIでインストールしますので、画面表示のために必要なパッケージをインストールします。
[root@oel77 ~]# yum install -y xorg-x11-xauth
Loaded plugins: langpacks, ulninfo
Resolving Dependencies
--> Running transaction check
---> Package xorg-x11-xauth.x86_64 1:1.0.9-1.el7 will be installed
--> Processing Dependency: libXmuu.so.1()(64bit) for package: 1:xorg-x11-xauth-1.0.9-1.el7.x86_64
--> Running transaction check
---> Package libXmu.x86_64 0:1.1.2-2.el7 will be installed
--> Processing Dependency: libXt.so.6()(64bit) for package: libXmu-1.1.2-2.el7.x86_64
--> Running transaction check
---> Package libXt.x86_64 0:1.1.5-3.el7 will be installed
--> Processing Dependency: libSM.so.6()(64bit) for package: libXt-1.1.5-3.el7.x86_64
--> Processing Dependency: libICE.so.6()(64bit) for package: libXt-1.1.5-3.el7.x86_64
--> Running transaction check
---> Package libICE.x86_64 0:1.0.9-9.el7 will be installed
---> Package libSM.x86_64 0:1.2.2-2.el7 will be installed
--> Finished Dependency Resolution

Dependencies Resolved

========================================================================================================================
 Package                          Arch                     Version                         Repository              Size
========================================================================================================================
Installing:
 xorg-x11-xauth                   x86_64                   1:1.0.9-1.el7                   OEL77DVD                 29 k
Installing for dependencies:
 libICE                           x86_64                   1.0.9-9.el7                     OEL77DVD                 66 k
 libSM                            x86_64                   1.2.2-2.el7                     OEL77DVD                 39 k
 libXmu                           x86_64                   1.1.2-2.el7                     OEL77DVD                 70 k
 libXt                            x86_64                   1.1.5-3.el7                     OEL77DVD                172 k

Transaction Summary
========================================================================================================================
Install  1 Package (+4 Dependent packages)

Total download size: 377 k
Installed size: 865 k
Downloading packages:
------------------------------------------------------------------------------------------------------------------------
Total                                                                                   4.8 MB/s | 377 kB  00:00:00
Running transaction check
Running transaction test
Transaction test succeeded
Running transaction
  Installing : libICE-1.0.9-9.el7.x86_64                                                                            1/5
  Installing : libSM-1.2.2-2.el7.x86_64                                                                             2/5
  Installing : libXt-1.1.5-3.el7.x86_64                                                                             3/5
  Installing : libXmu-1.1.2-2.el7.x86_64                                                                            4/5
  Installing : 1:xorg-x11-xauth-1.0.9-1.el7.x86_64                                                                  5/5
  Verifying  : libXmu-1.1.2-2.el7.x86_64                                                                            1/5
  Verifying  : libSM-1.2.2-2.el7.x86_64                                                                             2/5
  Verifying  : libICE-1.0.9-9.el7.x86_64                                                                            3/5
  Verifying  : 1:xorg-x11-xauth-1.0.9-1.el7.x86_64                                                                  4/5
  Verifying  : libXt-1.1.5-3.el7.x86_64                                                                             5/5

Installed:
  xorg-x11-xauth.x86_64 1:1.0.9-1.el7

Dependency Installed:
  libICE.x86_64 0:1.0.9-9.el7   libSM.x86_64 0:1.2.2-2.el7   libXmu.x86_64 0:1.1.2-2.el7   libXt.x86_64 0:1.1.5-3.el7

Complete!
自端末にXServerソフトをインストール
サーバ側のインストール画面を自端末に転送するために、X Serverソフトをインストールします。
以下リンクからダウンロードできるXmingであればインストールして起動しておくだけです。

透過的HugePagesの無効化確認
[root@oel77 ~]# cat /sys/kernel/mm/transparent_hugepage/enabled
[always] madvise never
neverではない場合、/etc/default/grub に以下赤文字のパラメータ[transparent_hugepage=never]を追加
[root@oel77 ~]# vi /etc/default/grub
===
GRUB_TIMEOUT=5
GRUB_DISTRIBUTOR="$(sed 's, release .*$,,g' /etc/system-release)"
GRUB_DEFAULT=saved
GRUB_DISABLE_SUBMENU=true
GRUB_TERMINAL_OUTPUT="console"
GRUB_CMDLINE_LINUX="crashkernel=auto rd.lvm.lv=ol/root rd.lvm.lv=ol/swap rhgb quiet transparent_hugepage=never"
GRUB_DISABLE_RECOVERY="true"
===
修正が完了したらgrub.cfgを再作成します。
[root@oel77 ~]# grub2-mkconfig -o /boot/grub2/grub.cfg
Generating grub configuration file ...
Found linux image: /boot/vmlinuz-4.14.35-1902.3.2.el7uek.x86_64
Found initrd image: /boot/initramfs-4.14.35-1902.3.2.el7uek.x86_64.img
Found linux image: /boot/vmlinuz-3.10.0-1062.el7.x86_64
Found initrd image: /boot/initramfs-3.10.0-1062.el7.x86_64.img
Found linux image: /boot/vmlinuz-0-rescue-2d0aa025178a484386baec4f0198d44e
Found initrd image: /boot/initramfs-0-rescue-2d0aa025178a484386baec4f0198d44e.img
done
grubの設定を反映させるためにOSを再起動します。
[root@oel77 ~]# systemctl reboot
neverになっていることを確認できればOKです。
[root@oel77 ~]# cat /sys/kernel/mm/transparent_hugepage/enabled
always madvise [never]
I/Oスケジューラの確認
deadlineになっていれば大丈夫です。基本的にデフォルトでdeadlineです。
[root@oel77 ~]# cat /sys/block/sda/queue/scheduler
noop [deadline] cfq
必要パッケージのインストール
[root@oel77 ~]# yum install -y bc
[root@oel77 ~]# yum install -y binutils
[root@oel77 ~]# yum install -y compat-libcap1
[root@oel77 ~]# yum install -y compat-libstdc++
[root@oel77 ~]# yum install -y dtrace-modules
[root@oel77 ~]# yum install -y dtrace-modules-headers
[root@oel77 ~]# yum install -y dtrace-modules-provider-headers
[root@oel77 ~]# yum install -y dtrace-utils
[root@oel77 ~]# yum install -y elfutils-libelf
[root@oel77 ~]# yum install -y elfutils-libelf-devel
[root@oel77 ~]# yum install -y fontconfig-devel
[root@oel77 ~]# yum install -y glibc
[root@oel77 ~]# yum install -y glibc-devel
[root@oel77 ~]# yum install -y ksh
[root@oel77 ~]# yum install -y libaio
[root@oel77 ~]# yum install -y libaio-devel
[root@oel77 ~]# yum install -y libdtrace-ctf-devel
[root@oel77 ~]# yum install -y libXrender
[root@oel77 ~]# yum install -y libXrender-devel
[root@oel77 ~]# yum install -y libX11
[root@oel77 ~]# yum install -y libXau
[root@oel77 ~]# yum install -y libXi
[root@oel77 ~]# yum install -y libXtst
[root@oel77 ~]# yum install -y libgcc
[root@oel77 ~]# yum install -y librdmacm-devel
[root@oel77 ~]# yum install -y libstdc++
[root@oel77 ~]# yum install -y libstdc++-devel
[root@oel77 ~]# yum install -y libxcb
[root@oel77 ~]# yum install -y make
カーネルパラメータの設定
以下のファイルを作成します。
[root@oel77 ~]# vi /etc/sysctl.d/97-oracle-database-sysctl.conf
fs.aio-max-nr = 1048576
fs.file-max = 6815744
kernel.shmall = 2097152
kernel.shmmax = 4294967295
kernel.shmmni = 4096
kernel.sem = 250 32000 100 128
net.ipv4.ip_local_port_range = 9000 65500
net.core.rmem_default = 262144
net.core.rmem_max = 4194304
net.core.wmem_default = 262144
net.core.wmem_max = 1048576
設定を反映させます。
[root@oel77 ~]# sysctl --system
[root@oel77 ~]# sysctl -a
以下で設定を確認して変更されていればOKです。
[root@oel77 ~]# sysctl -a | grep aio-max-nr
fs.aio-max-nr = 1048576
[root@oel77 ~]# sysctl -a | grep file-max
fs.file-max = 6815744
OSを再起動します。
[root@oel77 ~]# systemctl reboot
グループの作成
[root@oel77 ~]# groupadd -g 54321 oinstall
[root@oel77 ~]# groupadd -g 54322 dba
[root@oel77 ~]# groupadd -g 54323 oper
[root@oel77 ~]# groupadd -g 54324 backupdba
[root@oel77 ~]# groupadd -g 54325 dgdba
[root@oel77 ~]# groupadd -g 54326 kmdba
oracleユーザーの作成
[root@oel77 ~]# useradd -u 54321 -g oinstall -G dba,oper,backupdba,dgdba,kmdba oracle
[root@oel77 ~]# passwd oracle
Changing password for user oracle.
New password: ←設定するパスワードを入力
Retype new password: ←再度設定するパスワードを入力
passwd: all authentication tokens updated successfully.
oracleユーザのumask変更
以下の様に赤文字の[umask 022]を追加します。
[root@oel77 ~]# vi /home/oracle/.bash_profile
# .bash_profile

# Get the aliases and functions
if [ -f ~/.bashrc ]; then
        . ~/.bashrc
fi

# User specific environment and startup programs

PATH=$PATH:$HOME/.local/bin:$HOME/bin

export PATH
umask 022
Oracleユーザーのリソース制限を変更
limits.confに以下の赤文字部分を追加します。
[root@oel77 ~]# vi /etc/security/limits.conf
# /etc/security/limits.conf
#
#This file sets the resource limits for the users logged in via PAM.
#It does not affect resource limits of the system services.
#
#Also note that configuration files in /etc/security/limits.d directory,
#which are read in alphabetical order, override the settings in this
#file in case the domain is the same or more specific.
#That means for example that setting a limit for wildcard domain here
#can be overriden with a wildcard setting in a config file in the
#subdirectory, but a user specific setting here can be overriden only
#with a user specific setting in the subdirectory.
#
#Each line describes a limit for a user in the form:
#
#
#
#Where:
# can be:
#        - a user name
#        - a group name, with @group syntax
#        - the wildcard *, for default entry
#        - the wildcard %, can be also used with %group syntax,
#                 for maxlogin limit
#
# can have the two values:
#        - "soft" for enforcing the soft limits
#        - "hard" for enforcing hard limits
#
# can be one of the following:
#        - core - limits the core file size (KB)
#        - data - max data size (KB)
#        - fsize - maximum filesize (KB)
#        - memlock - max locked-in-memory address space (KB)
#        - nofile - max number of open file descriptors
#        - rss - max resident set size (KB)
#        - stack - max stack size (KB)
#        - cpu - max CPU time (MIN)
#        - nproc - max number of processes
#        - as - address space limit (KB)
#        - maxlogins - max number of logins for this user
#        - maxsyslogins - max number of logins on the system
#        - priority - the priority to run user process with
#        - locks - max number of file locks the user can hold
#        - sigpending - max number of pending signals
#        - msgqueue - max memory used by POSIX message queues (bytes)
#        - nice - max nice priority allowed to raise to values: [-20, 19]
#        - rtprio - max realtime priority
#
#
#

#*               soft    core            0
#*               hard    rss             10000
#@student        hard    nproc           20
#@faculty        soft    nproc           20
#@faculty        hard    nproc           50
#ftp             hard    nproc           0
#@student        -       maxlogins       4
oracle          soft    nproc            2047
oracle          hard    nproc           16384
oracle          soft    nofile           1024
oracle          hard    nofile          65536
oracle          soft    stack           10240
oracle          hard    stack           32768
# End of file
ダウンロードしたインストールファイルを配置
scp等でダウンロードしたインストール用ファイルを/tmpへ配置します。
[root@oel77 ~]# ls -l /tmp/LINUX.X64_193000_db_home.zip
-rw-r--r-- 1 root root 3059705302 Nov 23 08:11 /tmp/LINUX.X64_193000_db_home.zip
Oracleをインストールするディレクトリを作成
[root@oel77 ~]# mkdir -p /u01/app/oracle
[root@oel77 ~]# chown oracle:oinstall /u01/app/oracle
[root@oel77 ~]# chmod -R 775 /u01
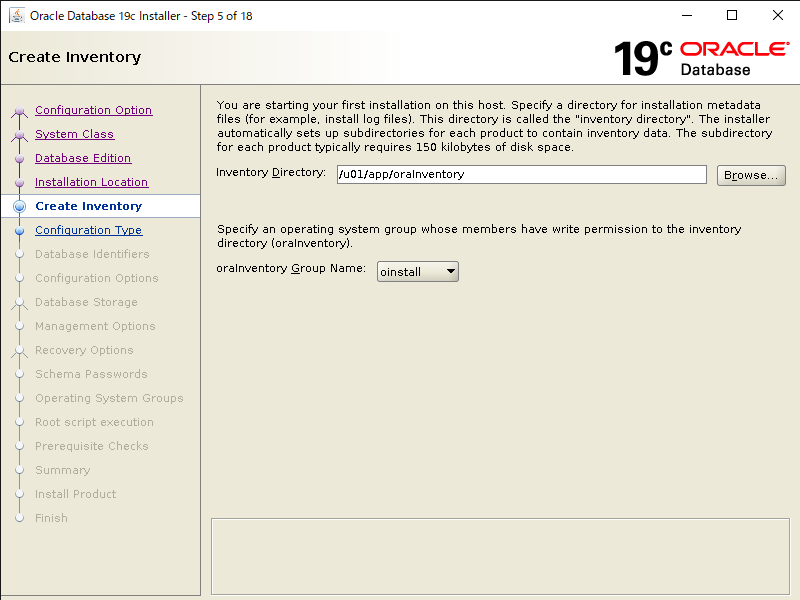
Oracle Inventoryディレクトリを作成
[root@oel77 ~]# mkdir -p /u01/app/oraInventory
[root@oel77 ~]# chown oracle:oinstall /u01/app/oraInventory
[root@oel77 ~]# chmod -R 775 /u01
ダウンロードしたDatabaseインストール用ファイルを解凍する
[root@oel77 ~]# su - oracle
[oracle@oel77 ~]$ mkdir -p /u01/app/oracle/product/19.0.3/dbhome_1
[oracle@oel77 ~]$ chgrp oinstall /u01/app/oracle/product/19.0.3/dbhome_1
[oracle@oel77 ~]$ cd /u01/app/oracle/product/19.0.3/dbhome_1
[oracle@oel77 ~]$ unzip -q /tmp/LINUX.X64_193000_db_home.zip
Oracle Database 19c インストール
インストーラーの起動
新規ターミナルを開き、oracleユーザでログインします。
[oracle@oel77 ~]$ cd /u01/app/oracle/product/19.0.3/dbhome_1
[oracle@oel77 ~]$ export LANG=C
[oracle@oel77 ~]$ ./runInstaller
GUI画面でのインストール
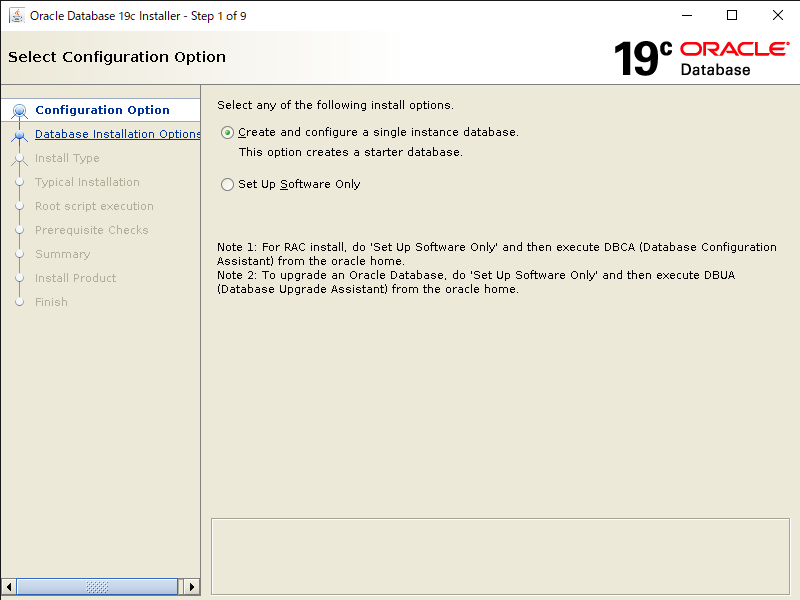
今回はOracleソフトウェアとシングルデータベースを作成するので、「Create and configure a single instance database. This option creates a starter database.」を選択します。
Oracleソフトウェアのみをインスールする際は、「Set Up Software Only」を選択します。
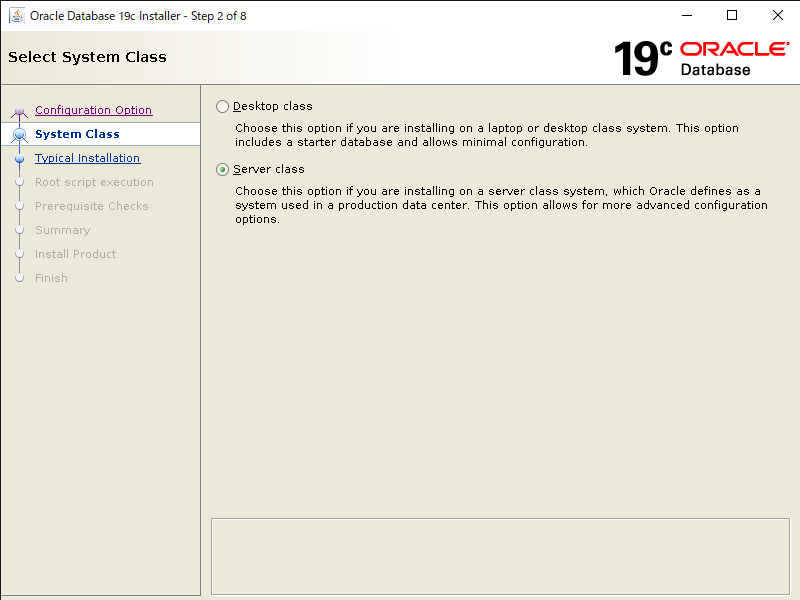
今回はサーバにインスールすることを想定しているので、「Server Class」を選択します。
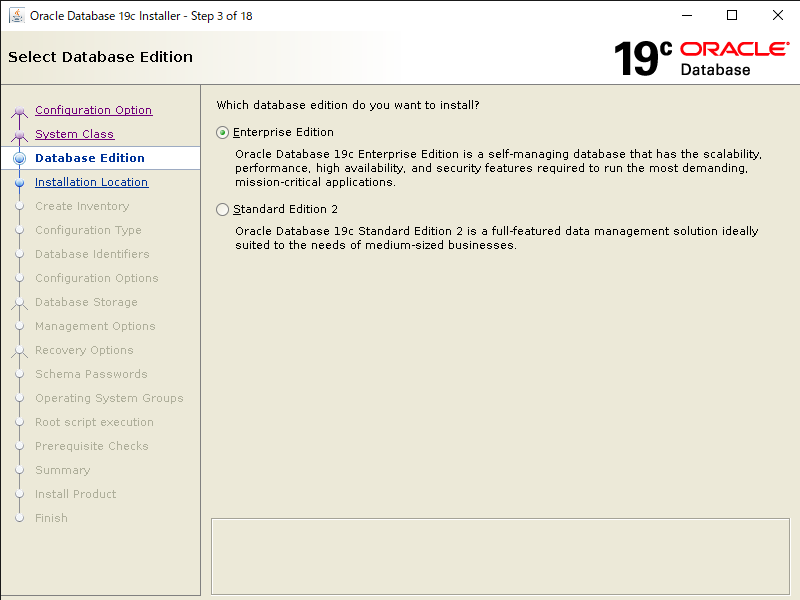
ライセンス形態によって判断しますが、今回は「Enterprize Edition」を選択します。
Oracle Databaseをインストールするパスを指定します。
Oracle Baseはインストール前の準備で作成した「/u01/app/oracle」にします。
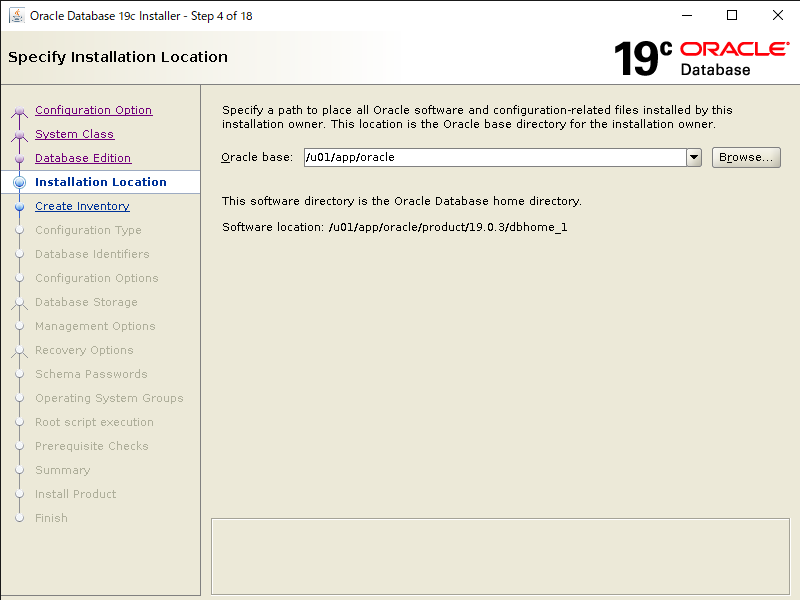
Inventory Direcrotyはデフォルトだと「oraInventory」なのでこのままにします。
orainventory Group Nameは準備で作成したグループ「oinstall」にします。
作成するデータベースのタイプを選択します。
今回はOLTP向けのデータベースとして「General Purpose / Transaction Processing」を選択します。

データベースの名前を設定し、PDBも一緒に作成します。好きな名称で大丈夫です。今回はhogeにしました。

「Memory」タブでOracle Database(SGA/PGA)に割り当てるメモリを決めます。今回は1536[MB]にしてみました。

「Character sets」タブで文字コードを決めます。今回は汎用的なUnicode(AL32UTF8)を選択します。

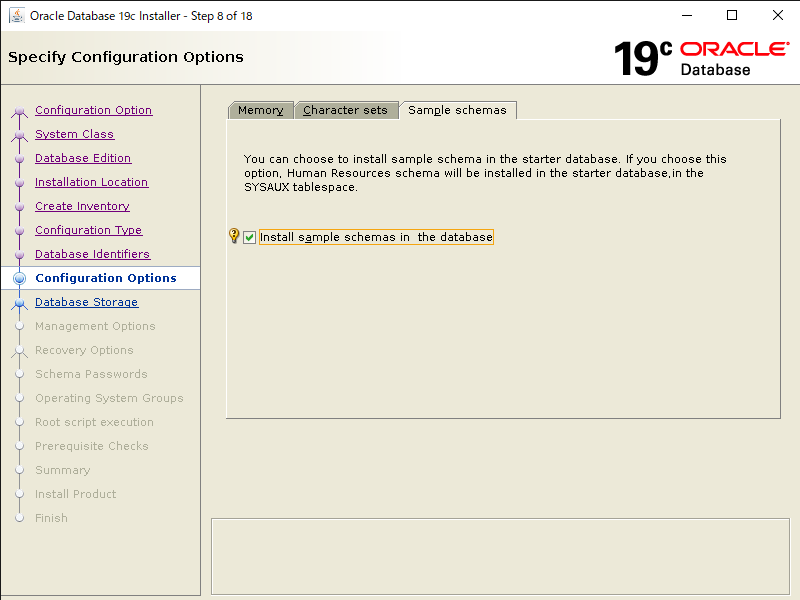
「Sample schemas」タブサンプルユーザーを作成するか決められます。今回はサンプルユーザを作るために「Install sample schemas in database」にチェックを入れています。
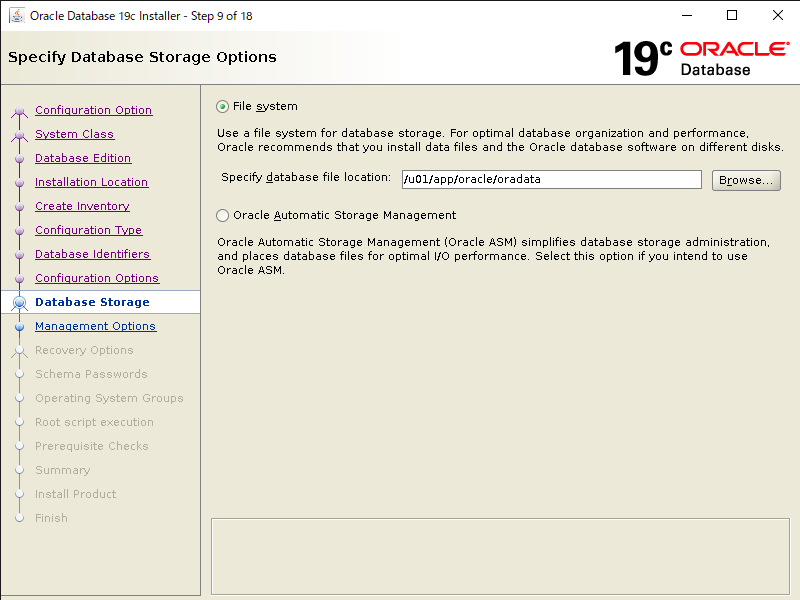
データベースの保存先を選択します。今回はOS上のファイルシステムに保存するので「File system」を選択し、保存先は「/u01/app/oracle/oradata」とします。
Enterprize Manager(統合的な監視ツール)への登録はしないのでチェックなしで進みます。

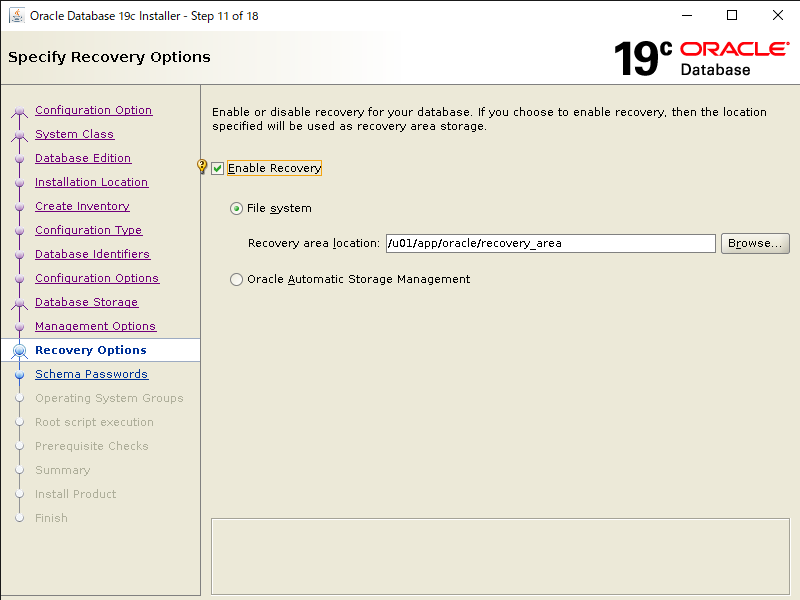
高速リカバリ領域の設定です。バックアップも試せるようにチェックを入れて「/u01/app/oracle/recovery_area」を指定します。
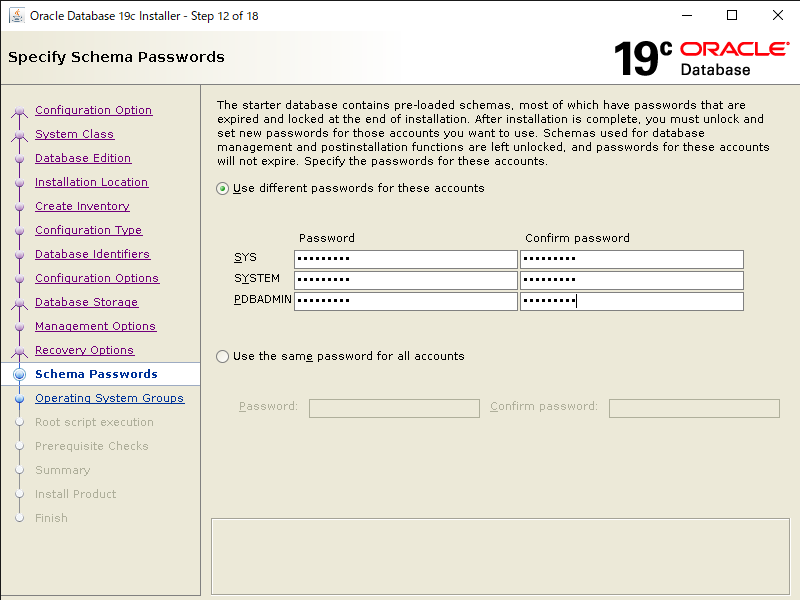
DB管理ユーザのパスワードをそれぞれ入力します。全て同じパスワードにしたい場合は「Use the same passwords for these account」を選択してパスワードを入力してください。
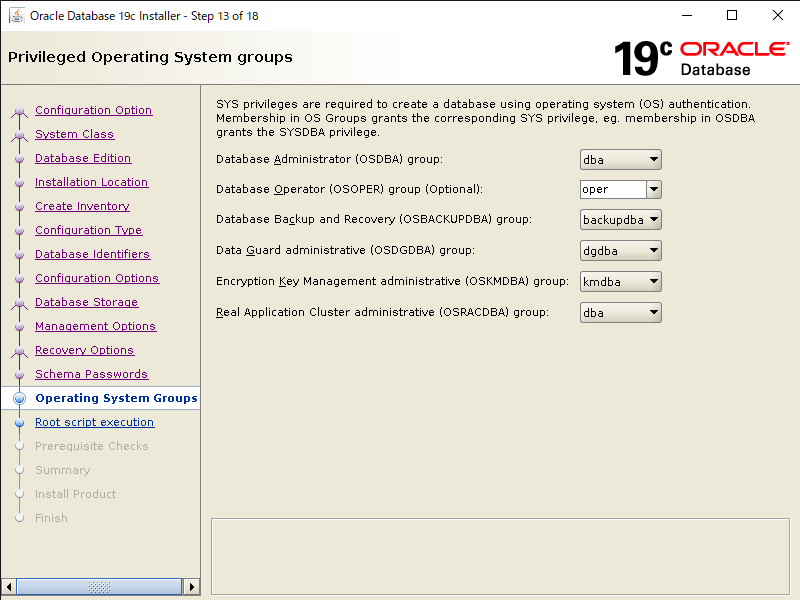
権限グループを設定します。準備で作成したグループがデフォルトで以下の様にセットされますので、このまま進めます。
OSDBA: dba
OSOPER: oper
OSBACKUPDBA: backupdba
OSDGDBA: dgdba
OSKMDBA: kmdba
OSRACDBA: dba
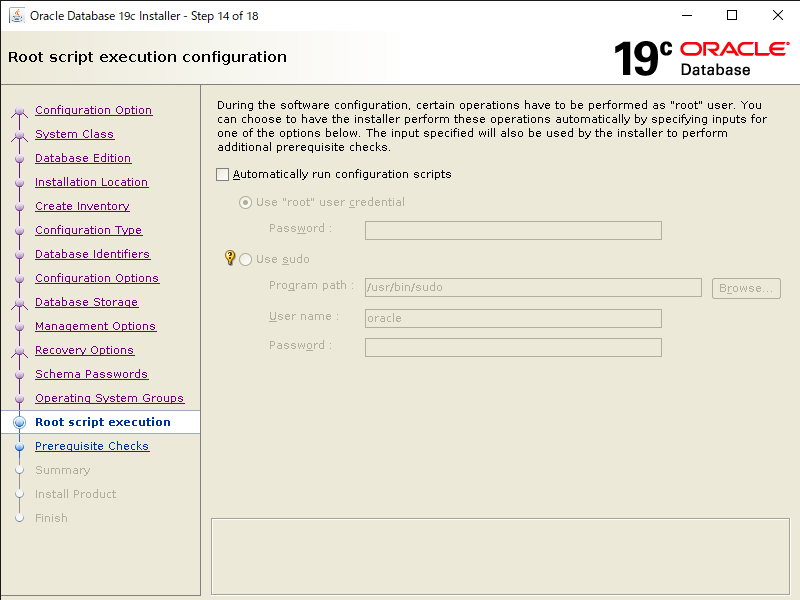
rootスクリプトを自動で実行するかを決めます。
今回は自分で実行するので、チェックは付けずに進めます。
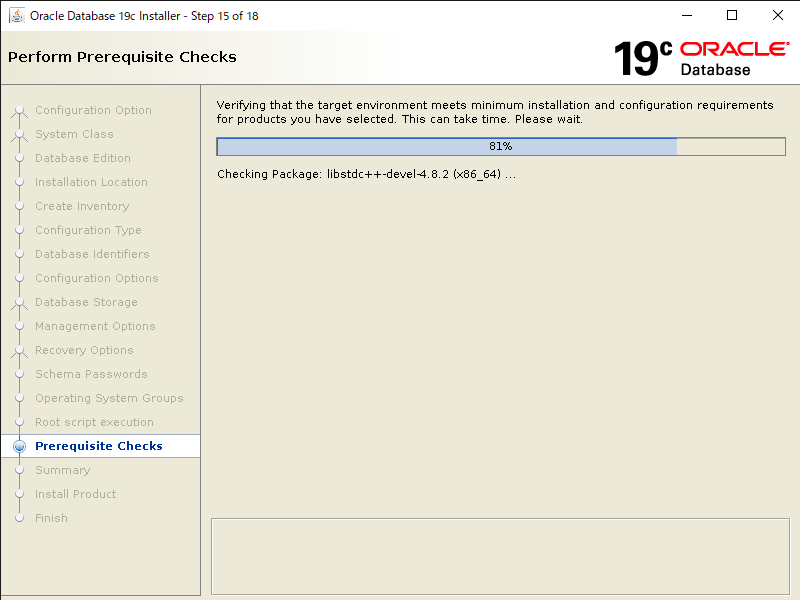
インスールする前の前提チェックが走ります。何もなければ自動的に次の画面へ進みますが、前提チェックに不備があるとチェックにひっかかった箇所が表示されるので、修正して再度チェックします。
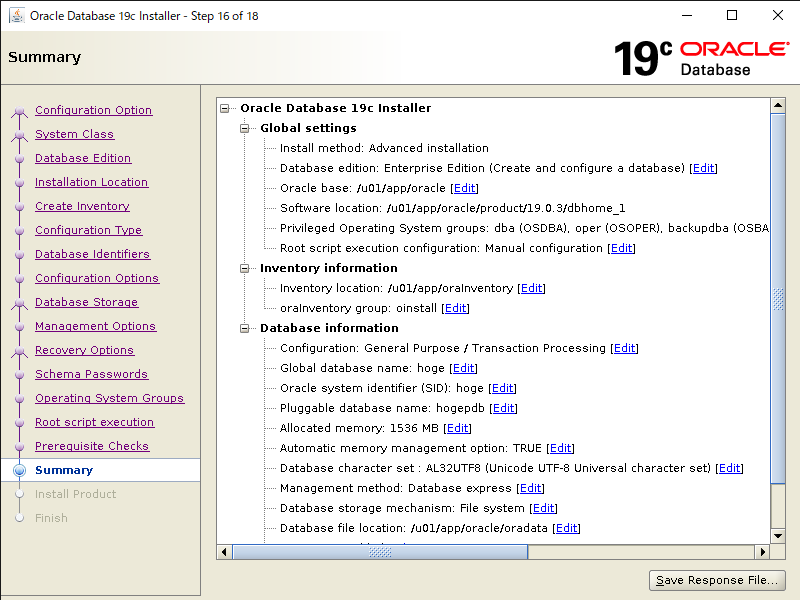
インストールの最終的な設定確認画面が表示されます。内容を確認して問題なければ「Install」をクリックします。
インストールが始まります。
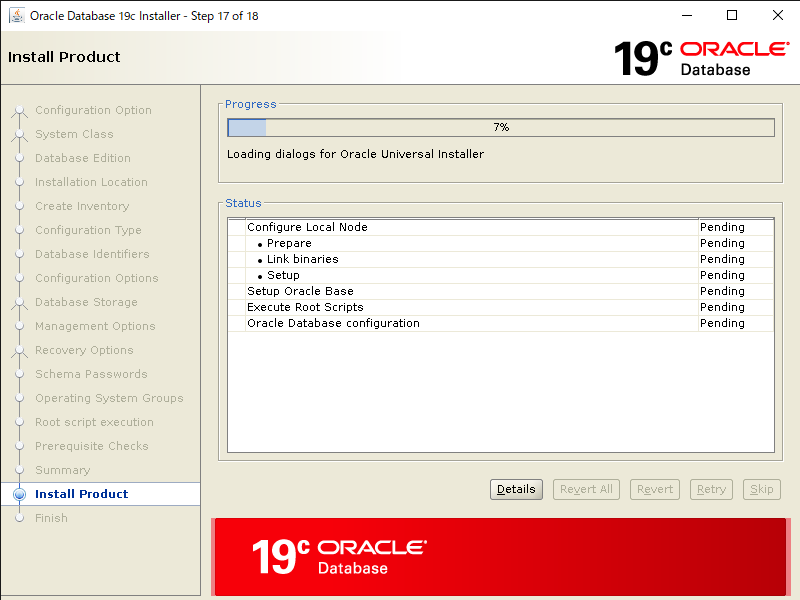
途中、別窓でroot.shの実行画面が表示されます。
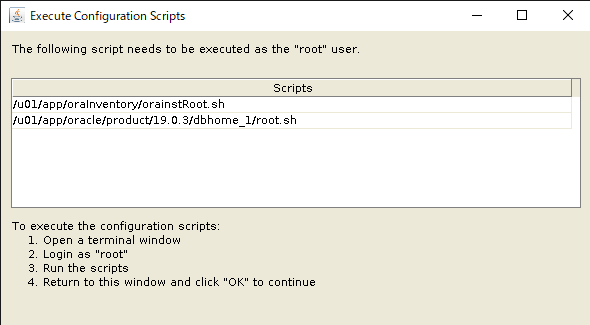
rootユーザで新規ログインし、画面に表示されているコマンドを実行します。
[root@oel77 ~]# /u01/app/oraInventory/orainstRoot.sh
Changing permissions of /u01/app/oraInventory.
Adding read,write permissions for group.
Removing read,write,execute permissions for world.

Changing groupname of /u01/app/oraInventory to oinstall.
The execution of the script is complete.
[root@oel77 ~]#
[root@oel77 ~]# /u01/app/oracle/product/19.0.3/dbhome_1/root.sh
Performing root user operation.

The following environment variables are set as:
    ORACLE_OWNER= oracle
    ORACLE_HOME=  /u01/app/oracle/product/19.0.3/dbhome_1

Enter the full pathname of the local bin directory: [/usr/local/bin]:
   Copying dbhome to /usr/local/bin ...
   Copying oraenv to /usr/local/bin ...
   Copying coraenv to /usr/local/bin ...


Creating /etc/oratab file...
Entries will be added to the /etc/oratab file as needed by
Database Configuration Assistant when a database is created
Finished running generic part of root script.
Now product-specific root actions will be performed.
Oracle Trace File Analyzer (TFA - Standalone Mode) is available at :
    /u01/app/oracle/product/19.0.3/dbhome_1/bin/tfactl

Note :
1. tfactl will use TFA Service if that service is running and user has been granted access
2. tfactl will configure TFA Standalone Mode only if user has no access to TFA Service or TFA is not installed

[root@oel77 ~]#
完了したらroot.shの実行画面に戻り「OK」を押します。
再度インストール画面に戻るので、完了までしばらく待ちます。
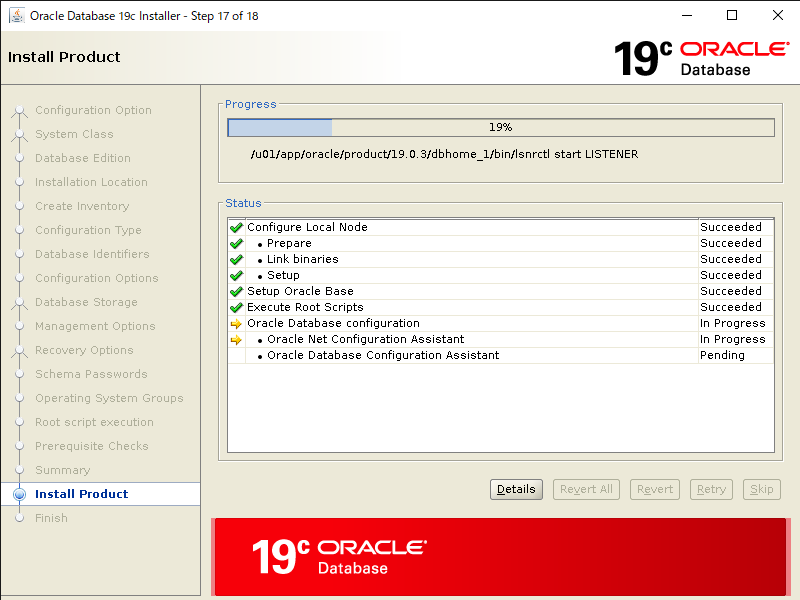
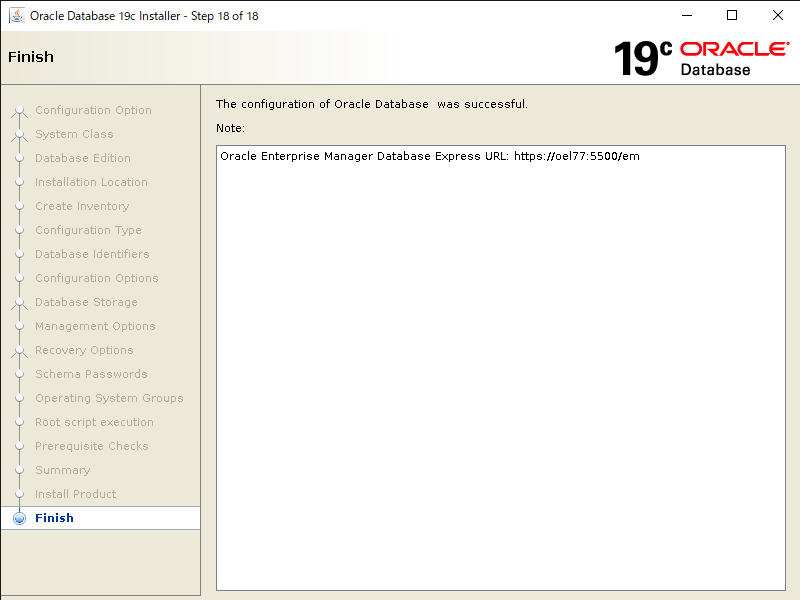
この画面が出ればOracle Databaseインストールとシングルインスタンスの作成が完了です。
oracleユーザの環境設定
以下の赤文字部分を追加します。NLS_LANGは日本語にしています。
[root@oel77 ~]# vi /home/oracle/.bash_profile
===
# .bash_profile

# Get the aliases and functions
if [ -f ~/.bashrc ]; then
        . ~/.bashrc
fi

# User specific environment and startup programs

PATH=$PATH:$HOME/.local/bin:$HOME/bin

export PATH
umask 022
export ORACLE_BASE=/u01/app/oracle
export ORACLE_HOME=/u01/app/oracle/product/19.0.3/dbhome_1
export ORACLE_SID=hoge
export NLS_LANG=Japanese_Japan.AL32UTF8
export PATH=$ORACLE_HOME/bin:$PATH
設定反映のためにprofileを読み込みます。
[oracle@oel77 ~]$ source /home/oracle/.bash_profile
データベースへの接続確認
作成したデータベースに接続して、インスタンスのステータスを表示してみます。
[oracle@oel77 ~]$ sqlplus / as sysdba

SQL*Plus: Release 19.0.0.0.0 - Production on 日 11月 23 23:57:31 2019
Version 19.3.0.0.0

Copyright (c) 1982, 2019, Oracle.  All rights reserved.

Oracle Database 19c Enterprise Edition Release 19.0.0.0.0 - Production
Version 19.3.0.0.0
に接続されました。
SQL> select instance_name,status from v$instance;

INSTANCE_NAME    STATUS
---------------- ------------
hoge             OPEN
以上でOracle Database 19c のインストールは完了です。
私は、絵で見てわかるOracleの仕組み の本でOracleのアーキテクチャを学びました。文章ではなかなかわかりにくいことも、絵にまとまっているとイメージしやすいので参考にしてみてください。
Oracleの技術者になるには、まずは仕組み・アーキテクチャの部分の理解だと思いますので、Oracleを勉強される方にはおすすめの本です!
DB接続クライアントになるフロントサーバ等にOracle Clientのみをインストールする手順については、以下Oracle Client 19cのインストール手順を参考にしてください。